MAKING THE TOP - PART 1
Most guitar builders are clear that the top is the heart and soul of the guitar. These pages will detail the steps that I go through to build the top - from raw wood to finished top ready to glue to the ribs.
Most of my guitars are made of Sitka Spruce, although I occasionally use Engelmann spruce, Adirondack spruce and cedar. One of the real benefits of the explosion of fine acoustic guitars is that there are a number of wood suppliers who really do know how to cut spruce for use in guitars. At least right now there is a ready (but expensive) supply of fine top wood in all species.
I look for several things in my top wood: First it must be well quarter-sawn and there must be a minimum of runout. I prefer wood that has relatively fine grain (but not extremely fine grain) that is relatively even across the width of the entire top. I like the wood to be relatively stiff across the width of the top. I also like the figure called "silk" which is actually the medulary rays showing, and is most obvious when the top is well quartered and with a minimum of runout. I am relatively unconcerned about color and even like to see a little bit of color variations and streaking -- I think they add visual interest and have no effect on tone.
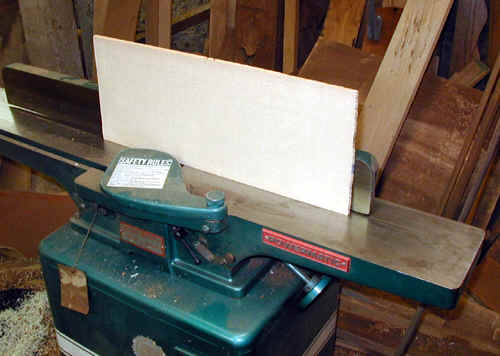 The first step is to join the two book matched pieces which will
become the top. I prepare the joined edge on my 6" Powermatic
Joiner. This is a simple task, provided the joiner
is properly adjusted.
The first step is to join the two book matched pieces which will
become the top. I prepare the joined edge on my 6" Powermatic
Joiner. This is a simple task, provided the joiner
is properly adjusted.
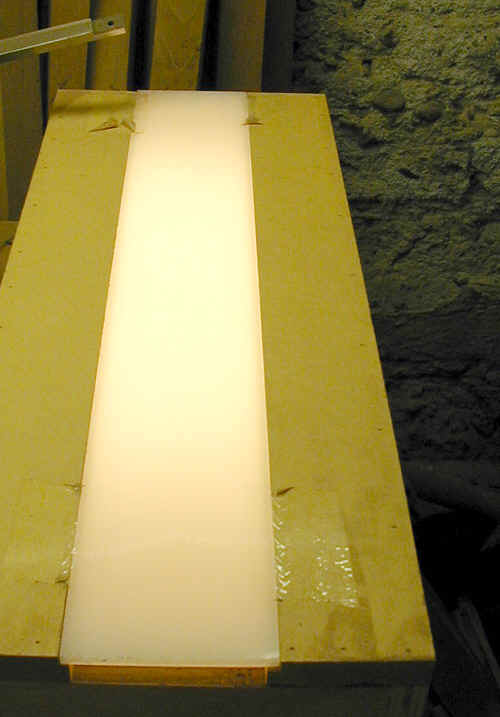 To check the quality of the joint I made a light box.
 Here the light box is in operation - and you can see the line of light
showing that the joint is not tight. If the jointer doesn't do the
job I will "shoot" it with a long hand plane.
Here the light box is in operation - and you can see the line of light
showing that the joint is not tight. If the jointer doesn't do the
job I will "shoot" it with a long hand plane.
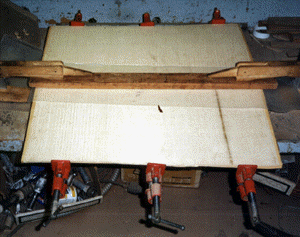 To edge glue the two pieces I made a clamp
jig. It consists of a piece of Formica covered MDF to which I have
added three pipe clamps, as shown here. I use a bar to hold down
the joint and ensure that it remains in register. This bar is simply
a narrow strip of wood, but it has been shaped with a bow in it.
When the ends are clamped down the board presses evenly along the entire
length of the top. I use wax paper to ensure that the top does not
stick to the jig.
To edge glue the two pieces I made a clamp
jig. It consists of a piece of Formica covered MDF to which I have
added three pipe clamps, as shown here. I use a bar to hold down
the joint and ensure that it remains in register. This bar is simply
a narrow strip of wood, but it has been shaped with a bow in it.
When the ends are clamped down the board presses evenly along the entire
length of the top. I use wax paper to ensure that the top does not
stick to the jig.
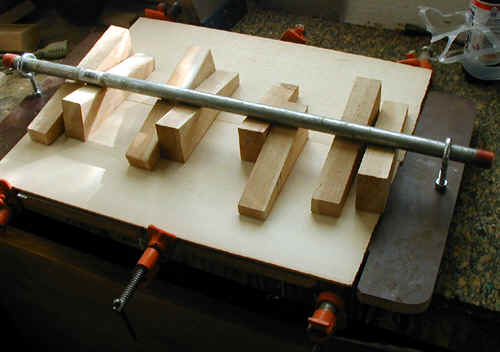 I recently made a new clamping jig - the photo is fairly self explanatory
- this works quite well and is quick. The new method of holding the
wood down helps to ensure that the joint is flush all along the joint.
I recently made a new clamping jig - the photo is fairly self explanatory
- this works quite well and is quick. The new method of holding the
wood down helps to ensure that the joint is flush all along the joint.
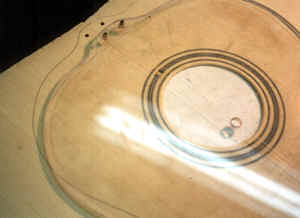
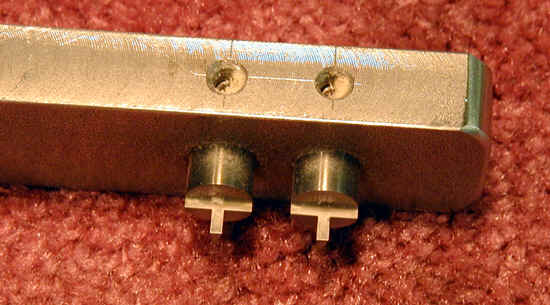
 This (and the next photo) show a simple bit of jigging which has
significant long range effects. I created a Baltic birch board with
drill bushings in it to drill three small holes in a rough top - two at
the top (dovetail end) and one at the back (end block end). These
holes are outside of the area of the actual top but serve as locators
for several tasks. The first of these is to locate the top on a
plexiglass jig I use to trim the rough top to size for future operations.
I also use these holes to locate the top in the jig I use to locate and
glue the top braces. This helps to insure uniformity in the location
of braces. I find that there are so many variables in a guitar that
it pays to tightly control as many as I can (including location of the
braces) and then make variations in only a few as I try to "voice"
the guitar.
This (and the next photo) show a simple bit of jigging which has
significant long range effects. I created a Baltic birch board with
drill bushings in it to drill three small holes in a rough top - two at
the top (dovetail end) and one at the back (end block end). These
holes are outside of the area of the actual top but serve as locators
for several tasks. The first of these is to locate the top on a
plexiglass jig I use to trim the rough top to size for future operations.
I also use these holes to locate the top in the jig I use to locate and
glue the top braces. This helps to insure uniformity in the location
of braces. I find that there are so many variables in a guitar that
it pays to tightly control as many as I can (including location of the
braces) and then make variations in only a few as I try to "voice"
the guitar.
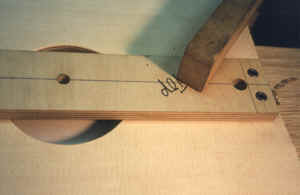
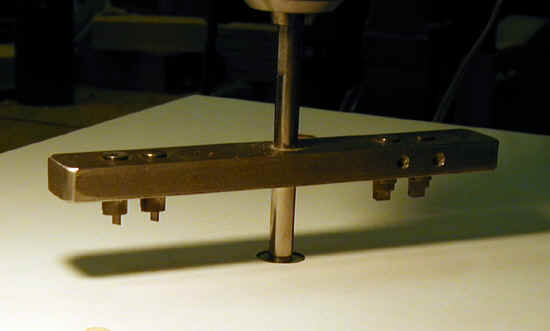
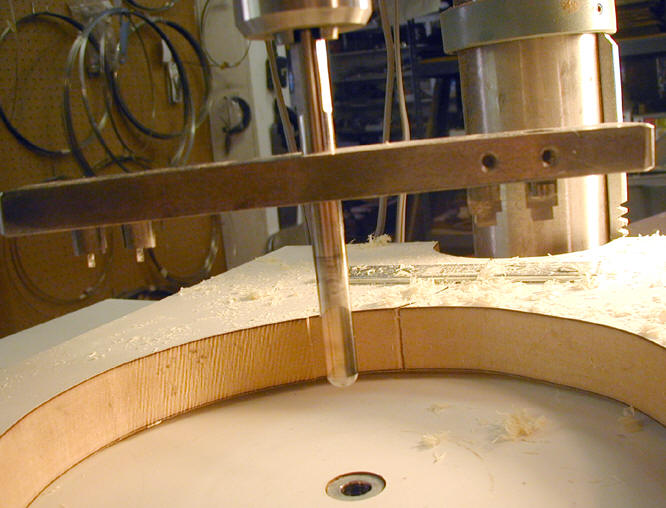
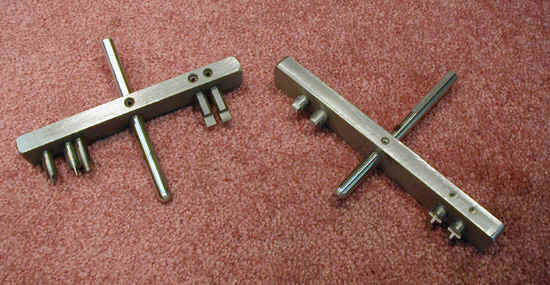
 Here is the jig used to trim the top to shape. It has three
small locating pins to match to the holes I just drilled in the top.
Here is the jig used to trim the top to shape. It has three
small locating pins to match to the holes I just drilled in the top.
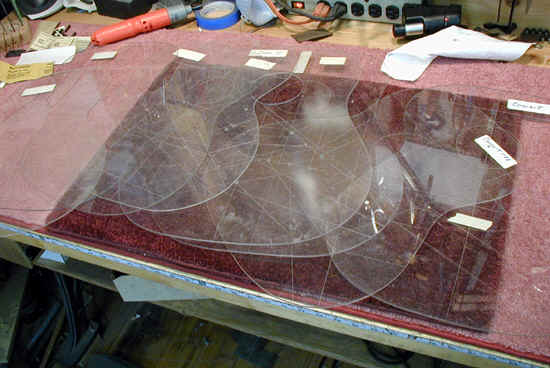 I use these Plexiglas templates to lay out the top and the placement for
braces.
I use these Plexiglas templates to lay out the top and the placement for
braces.
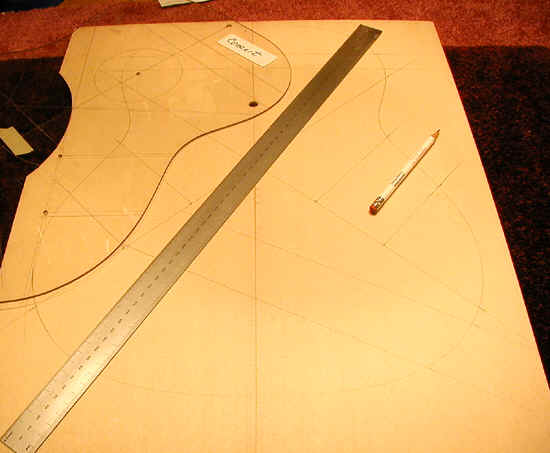 More of the same.
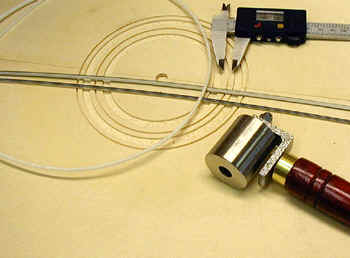
 The next step is to cut the rings for the soundhole rosette.
I use a fly cutter which I had made by a local machine shop. The
cutters are carefully sized to match the material I use for the rosette.
While this tool was expensive it works very well and has pretty much eliminated
problems with tearing and roughness. Before I had this tool made
I used a router on a circle cutting jig and, later, a set of individual
circle cutters. These all worked OK, but this tool is the best I
have used.
The next step is to cut the rings for the soundhole rosette.
I use a fly cutter which I had made by a local machine shop. The
cutters are carefully sized to match the material I use for the rosette.
While this tool was expensive it works very well and has pretty much eliminated
problems with tearing and roughness. Before I had this tool made
I used a router on a circle cutting jig and, later, a set of individual
circle cutters. These all worked OK, but this tool is the best I
have used.
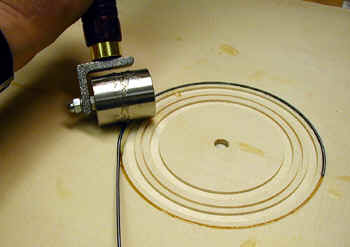
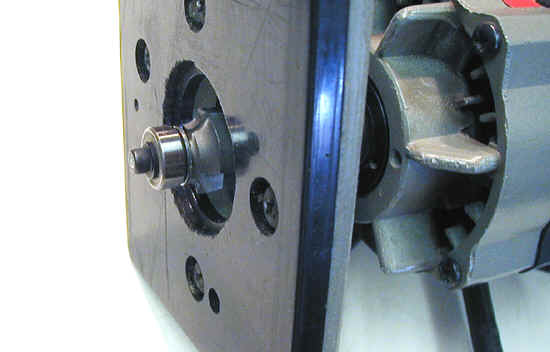
 The circle cutter is mounted in my drill press. The table is
a piece of Formica covered MDF with a metal bushing which accepts the
end of the 3/8" center shaft of the cutter. This way the cutter
is rigidly supported and this helps maintain a clean cut.
The circle cutter is mounted in my drill press. The table is
a piece of Formica covered MDF with a metal bushing which accepts the
end of the 3/8" center shaft of the cutter. This way the cutter
is rigidly supported and this helps maintain a clean cut.
 Here I am getting
ready to inlay the rosette. The calipers is necessary to ensure that
the various pieces fit properly in their respective slots. The
roller (a veneer roller) is used to press the pieces into the
slots.
Here I am getting
ready to inlay the rosette. The calipers is necessary to ensure that
the various pieces fit properly in their respective slots. The
roller (a veneer roller) is used to press the pieces into the
slots.
 Here I am putting
one of the lines of purfling (BWB) into the slot. I have already put
glue in the slot.
Here I am putting
one of the lines of purfling (BWB) into the slot. I have already put
glue in the slot.
 Here is the
finished job. this rosette will have an abalone strip in the
middle. At this point there is a strip of Teflon in its place.
Once it is sanded I can remove the Teflon (which is sized to match the
abalone strips) because the glue does not stick to it. There is
another method of doing rosettes, currently used by several very fine
makers, including, recently, me. It involves using cyanoacrilate glue to glue in the
strips. The first step is to coat the slots with vinyl sealer
to prevent the cyanoacrlate from penetrating the end grain of the spruce
(and discoloring it). Then a light coat of cyanoacrlate accelerator
is put in the slots and the strips are pressed in dry. Once
everything is in place, a bead of cyanoacrlate is run into the slots and
a good glue bond is achieved. This solves one problem -
that of the strips swelling from the moisture of the glue and either not
fitting the slots or of getting soft and mushy.
Here is the
finished job. this rosette will have an abalone strip in the
middle. At this point there is a strip of Teflon in its place.
Once it is sanded I can remove the Teflon (which is sized to match the
abalone strips) because the glue does not stick to it. There is
another method of doing rosettes, currently used by several very fine
makers, including, recently, me. It involves using cyanoacrilate glue to glue in the
strips. The first step is to coat the slots with vinyl sealer
to prevent the cyanoacrlate from penetrating the end grain of the spruce
(and discoloring it). Then a light coat of cyanoacrlate accelerator
is put in the slots and the strips are pressed in dry. Once
everything is in place, a bead of cyanoacrlate is run into the slots and
a good glue bond is achieved. This solves one problem -
that of the strips swelling from the moisture of the glue and either not
fitting the slots or of getting soft and mushy.
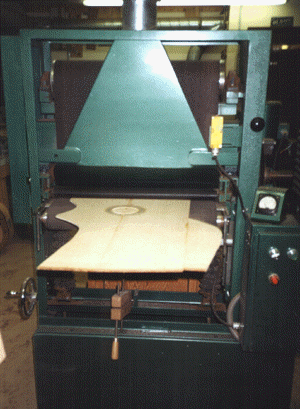 The next step is to sand the top to thickness. For a long time
I used a wide
belt thickness sander which is owned by my friend, Jim Olson.
This tool, which sands pieces up to 25" wide, is a guitarmakers dream.
It sands perfectly flat and uniform, and I can control the thickness to
within 2 - 4 thousandths of an inch. The final sanding is with a
120 grit belt so the finish is very smooth. The amazing thing is
that Jim built this tool himself, and it works as well or better than
the commercial sanders I have used. For makers without such a tool,
I recommend that you look around your area and find a cabinet shop that
has one. Often they will be happy to rent you time on their machine,
especially if you buy your own set of belts (as I do when using Jim's
sander). These days, since I am building full time again, in an
effort to minimize wear and tear on Jim's sander, I do much of my sanding
on a wide belt sander at a local cabinet shop. I also recently
purchased a 25" drum sander which I use for final dimensioning and
for sanding braces and other small parts. It is very handy to have
one in the shop.
The next step is to sand the top to thickness. For a long time
I used a wide
belt thickness sander which is owned by my friend, Jim Olson.
This tool, which sands pieces up to 25" wide, is a guitarmakers dream.
It sands perfectly flat and uniform, and I can control the thickness to
within 2 - 4 thousandths of an inch. The final sanding is with a
120 grit belt so the finish is very smooth. The amazing thing is
that Jim built this tool himself, and it works as well or better than
the commercial sanders I have used. For makers without such a tool,
I recommend that you look around your area and find a cabinet shop that
has one. Often they will be happy to rent you time on their machine,
especially if you buy your own set of belts (as I do when using Jim's
sander). These days, since I am building full time again, in an
effort to minimize wear and tear on Jim's sander, I do much of my sanding
on a wide belt sander at a local cabinet shop. I also recently
purchased a 25" drum sander which I use for final dimensioning and
for sanding braces and other small parts. It is very handy to have
one in the shop.
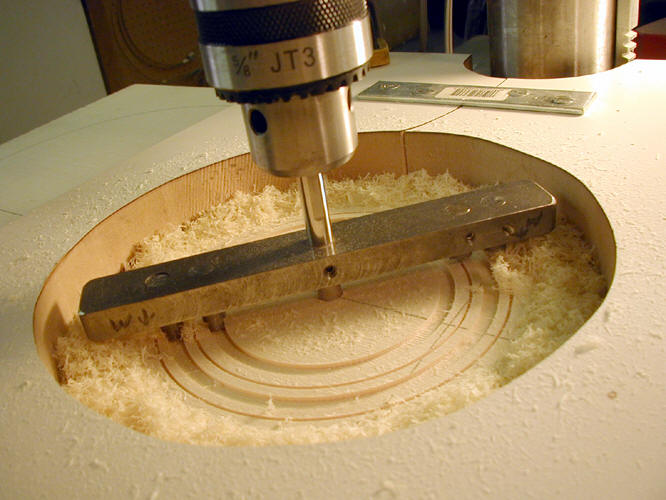
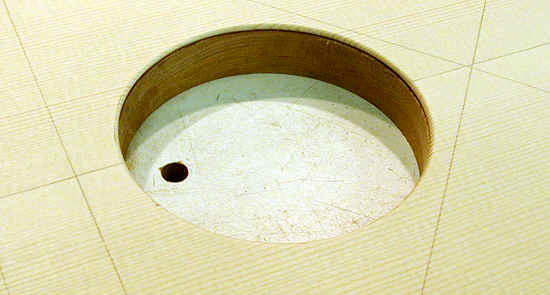
 After the top is sanded I cut out the soundhole with a different
fly cutter. I then round the edges with a small round over bit. This
is another ingenious idea I got from Jim Olson. Simply cut a hole
the exact size of the soundhole (I used the cutter which I use to cut
out the soundhole) in a piece of 3/4 hardwood stock and clamp the
top on it so that the soundhole exactly lines up over the hole.
Then use a piloted round over bit to round over the edge, flip over and
do the other side. Very quick and accurate.
After the top is sanded I cut out the soundhole with a different
fly cutter. I then round the edges with a small round over bit. This
is another ingenious idea I got from Jim Olson. Simply cut a hole
the exact size of the soundhole (I used the cutter which I use to cut
out the soundhole) in a piece of 3/4 hardwood stock and clamp the
top on it so that the soundhole exactly lines up over the hole.
Then use a piloted round over bit to round over the edge, flip over and
do the other side. Very quick and accurate.
 More of the same.
 And
more.
And
more.
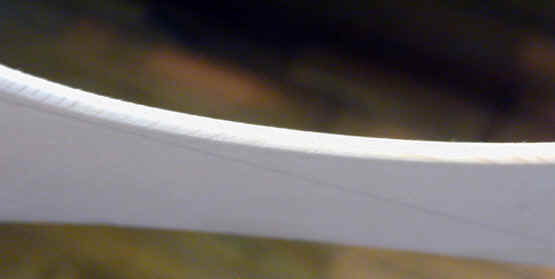 Final
edge of the soundhole.
Final
edge of the soundhole.
This website and all of its content, text and images are copyright ©1997-2011 by Charles A. Hoffman. All rights reserved.