TOOLS I HAVE MADE
Like most builders I know, from time to time I find a task which cannot be done easily with a tool (power or hand) which I can buy off the shelf. In that case, I often devise and make a tool of my own which will do the job. I have to admit that this is one of the real pleasures of guitar building -- it is often a significant intellectual challenge and when it works it is deeply satisfying. On this page I will collect a few of the tools I have made (or had made for me if I don't have the equipment to do it) and explain them.
First, a few words about why I do this and other more cosmic thoughts. Generally speaking, my motivation to build a special tool is to be able to perform the given task with greater accuracy and control (often the same thing). Building guitars often requires working wood to accuracy's of 1/64" or more, and repeatability is often important. While it is theoretically possible to do almost any task with only simple hand tools, it would be very difficult to have the precise control I want, and it would take an immense amount of time. At the risk of sounding trite, time is money, and it is very difficult to make money selling guitars built in this fashion. Which leads to the unintended, but very welcome consequence of building tools to perform a task with greater precision -- almost always you save a huge amount of time as well.
Another thought -- many of the ideas I have used are not original. Guitar makers are a remarkably sharing group, and I have never met one who tried to hide or protect their ideas. Probably the two makers who have given me the most ideas have been Stu Mossman (early on) ( Just a note here: Stu recently died (February, 1999), and he will be missed by many.) and Jim Olson. Stu Mossman's factory was the first I ever saw which had an appreciable amount of tooling, and it was a revelation to me. I immediately went out and bought a spindle shaper. Jim Olson and I have known each other since he first began (about 1978 if I remember correctly--I was the "old man" of guitar making in Minneapolis / St. Paul at the time) and have always delighted in "bragging" to each other about our new tools or new techniques. While Jim has probably "stolen" a few ideas from me, I know I have lifted (or modified or butchered) many from him.
In addition, there are almost always an infinite number of ways to "skin the cat." My ideas are not always (or even often) the best way. I think that the real mechanism is that seeing someone do a job with a "new" tool leads me to think about how to improve my own technique and leads to an entirely different way of doing it - inspired by someone else but still my own idea. The main thing we need, often, is simply to change our perspective -- to realize that there may be different or better ways, and take it where you personally are comfortable. And since it appears that I am beginning to lecture, I'll stop now and just show a few tools.
 I bind the Peghead of most of my guitars -
with a tortoise shell binding and a wbw purfling. As the curves
on the top of both my peghead shapes are quite sharp, it is hard to hold
the pieces properly in place while the glue dries. Tape simply won't
do it, and neither will any elastic I have tried. So, I built a
small "clamp" which puts pressure exactly where I want it.
It uses small clamp screws with swivel heads (which I bought from a machinists
supply house) and is anchored in the tuner hole. It uses a carefully
shaped Plexiglas caul between the clamp screw and the peghead which evenly
distributes the pressure. It works easily and quickly. Except
for the clamp screws, which cost perhaps a dollar each, it is all hand
made and inexpensive. I have used these for several hundred guitars,
so the amortized cost per guitar is infinitesimal.
I bind the Peghead of most of my guitars -
with a tortoise shell binding and a wbw purfling. As the curves
on the top of both my peghead shapes are quite sharp, it is hard to hold
the pieces properly in place while the glue dries. Tape simply won't
do it, and neither will any elastic I have tried. So, I built a
small "clamp" which puts pressure exactly where I want it.
It uses small clamp screws with swivel heads (which I bought from a machinists
supply house) and is anchored in the tuner hole. It uses a carefully
shaped Plexiglas caul between the clamp screw and the peghead which evenly
distributes the pressure. It works easily and quickly. Except
for the clamp screws, which cost perhaps a dollar each, it is all hand
made and inexpensive. I have used these for several hundred guitars,
so the amortized cost per guitar is infinitesimal.
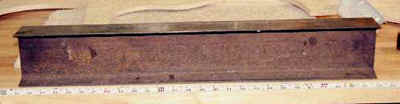 This
is a very low tech, but invaluable tool. I bought a steel "I"
beam at the local metal scrap yard, and took it to my friendly local
machine shop (For many years that meant literally next door) and had them
grind both flat surfaces to a true flat surface. They are wonderful
for clamping various parts together. Most obviously, I use it when
clamping fingerboards to the neck. Your imagination will suggest
a lot of other ideas.
This
is a very low tech, but invaluable tool. I bought a steel "I"
beam at the local metal scrap yard, and took it to my friendly local
machine shop (For many years that meant literally next door) and had them
grind both flat surfaces to a true flat surface. They are wonderful
for clamping various parts together. Most obviously, I use it when
clamping fingerboards to the neck. Your imagination will suggest
a lot of other ideas.
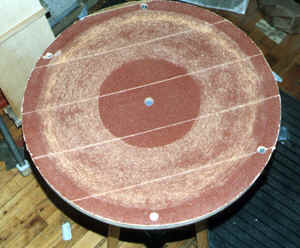
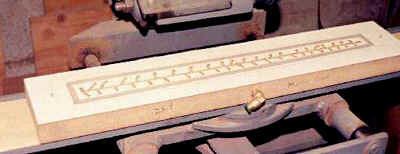 I
have recently started using vacuum
clamping for a number of tasks -- I love it. This is a fairly
"old" technique in the general woodworking industry, but the
cost was high. I first heard about using it in guitar making from
Richard Schneider, who had an article about it in the Luthier's Mercantile
catalog (if memory serves me right). In addition, Jim Olson uses
it a lot. So I bought a simple venturi style vacuum pump (it works
off compressed air from my compressor), bought a few cheap fittings and
was off to the races. The jig shown here is for slotting fingerboards.
It is made from Formica covered MDF -- a material sold for router table
tops. The top has a "ring" inset in which a closed foam
material is inset, and the "tree" pattern you see is simply
shallow groves designed to distribute the vacuum. The vacuum holds
the fingerboard firmly to the jig. You may notice two pins at the
ends--these locate the fingerboard. The bottom of the jig has slots
cut to match the scale length, and these are placed on a metal "finger".
This means I can use a single blade, (a "screw slitting blade"
-available from most machinist's supply houses) and at the cost
of a few supplies and a small amount of time, I can have a jig for
any scale length. It works very well, and costs next to nothing.
The saw itself (which I will show in a separate photo when I get around
to it) was custom made for me by a slightly crazy machinist in Wisconsin.
It works perfectly.
I
have recently started using vacuum
clamping for a number of tasks -- I love it. This is a fairly
"old" technique in the general woodworking industry, but the
cost was high. I first heard about using it in guitar making from
Richard Schneider, who had an article about it in the Luthier's Mercantile
catalog (if memory serves me right). In addition, Jim Olson uses
it a lot. So I bought a simple venturi style vacuum pump (it works
off compressed air from my compressor), bought a few cheap fittings and
was off to the races. The jig shown here is for slotting fingerboards.
It is made from Formica covered MDF -- a material sold for router table
tops. The top has a "ring" inset in which a closed foam
material is inset, and the "tree" pattern you see is simply
shallow groves designed to distribute the vacuum. The vacuum holds
the fingerboard firmly to the jig. You may notice two pins at the
ends--these locate the fingerboard. The bottom of the jig has slots
cut to match the scale length, and these are placed on a metal "finger".
This means I can use a single blade, (a "screw slitting blade"
-available from most machinist's supply houses) and at the cost
of a few supplies and a small amount of time, I can have a jig for
any scale length. It works very well, and costs next to nothing.
The saw itself (which I will show in a separate photo when I get around
to it) was custom made for me by a slightly crazy machinist in Wisconsin.
It works perfectly.
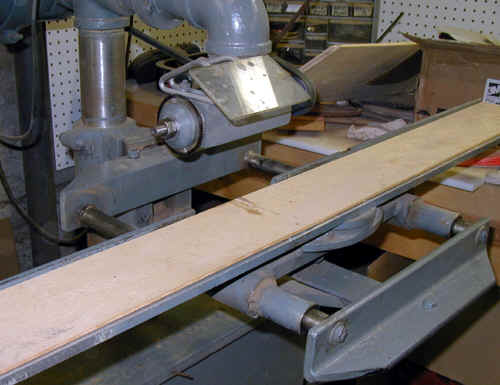
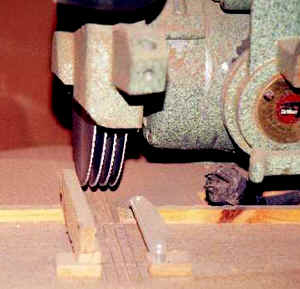 Making kerfed linings is one of those
jobs which always seemed to me should be mechanized -- I can conceive
of no possible benefit to "hand work" for this piece of the
guitar. At the same time, buying them from some of the suppliers
seems awfully expensive. Cutting the long triangular strips is relatively
easy -- it is a simple setup on my table saw, and the trick is to do several
hundred at a time so that that setup time is spread out over many guitars.
Cutting the slots evenly and accurately was more difficult, until I made
this tool. It is a very old DeWalt radial arm saw (It was my father's
and I remember when he got it in 1955!!) and I simply had spacers made
so that I could gang 4 blades at once. This makes the job
4 times as fast, and then a simple reference mark makes it possible to
move the linings forward the correct amount. The small guides you
can see are designed to help me hold 4 strips at a time, and provide a
guard to keep my fingers out of the way. Again, simple but effective.
Making kerfed linings is one of those
jobs which always seemed to me should be mechanized -- I can conceive
of no possible benefit to "hand work" for this piece of the
guitar. At the same time, buying them from some of the suppliers
seems awfully expensive. Cutting the long triangular strips is relatively
easy -- it is a simple setup on my table saw, and the trick is to do several
hundred at a time so that that setup time is spread out over many guitars.
Cutting the slots evenly and accurately was more difficult, until I made
this tool. It is a very old DeWalt radial arm saw (It was my father's
and I remember when he got it in 1955!!) and I simply had spacers made
so that I could gang 4 blades at once. This makes the job
4 times as fast, and then a simple reference mark makes it possible to
move the linings forward the correct amount. The small guides you
can see are designed to help me hold 4 strips at a time, and provide a
guard to keep my fingers out of the way. Again, simple but effective.
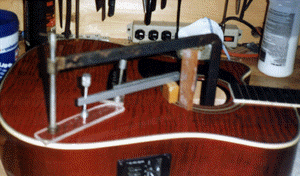
 This
is the jig I use to cut the dovetail in
my bodies. I cut the dovetail after the end blocks are attached
to the ribs but before the top or back is attached. I use a router
with a dovetail cutter and a template follower to follow the edge of the
jig. The jig is adjustable for size, and matches the shape of the
jig for the neck dovetail.
This
is the jig I use to cut the dovetail in
my bodies. I cut the dovetail after the end blocks are attached
to the ribs but before the top or back is attached. I use a router
with a dovetail cutter and a template follower to follow the edge of the
jig. The jig is adjustable for size, and matches the shape of the
jig for the neck dovetail.
 This
is the jig for cutting the dovetail
on neck blanks. Although the photo doesn't show it well, there
is an alignment piece that fits in the truss rod slot, and the De-Sta-Co
clamps hold the neck in place. The dovetail is cut with the same
dovetail cutter/template follower as is used for the body.
This
is the jig for cutting the dovetail
on neck blanks. Although the photo doesn't show it well, there
is an alignment piece that fits in the truss rod slot, and the De-Sta-Co
clamps hold the neck in place. The dovetail is cut with the same
dovetail cutter/template follower as is used for the body.
 This
is really not a home built jig. Many luthiers are using a sanding
jig which is simply a piece of MDF which has been hollowed out to the
same radius as the back and back braces (in this
case, a 15 foot radius). By putting sandpaper on this, and rotating
it around on the back of the ribs, one can shape the back (and the attached
linings) to the exact profile for a perfect fit to the braces. This
is a wonderful tool. I bought the form from LMI, and my contribution
is to glue on sandpaper, and attach handles to make it easier to manipulate.
I also drilled a hole in the middle so that it can rotate around a pipe
which is placed in the middle of the ribs (I will add photos of this operation
when I next do it).
This
is really not a home built jig. Many luthiers are using a sanding
jig which is simply a piece of MDF which has been hollowed out to the
same radius as the back and back braces (in this
case, a 15 foot radius). By putting sandpaper on this, and rotating
it around on the back of the ribs, one can shape the back (and the attached
linings) to the exact profile for a perfect fit to the braces. This
is a wonderful tool. I bought the form from LMI, and my contribution
is to glue on sandpaper, and attach handles to make it easier to manipulate.
I also drilled a hole in the middle so that it can rotate around a pipe
which is placed in the middle of the ribs (I will add photos of this operation
when I next do it).
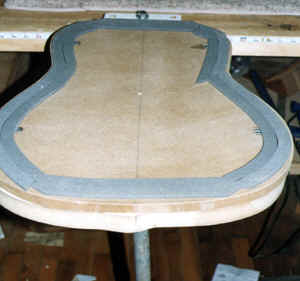 This
jig, which is made from another of the LMI forms for back radius, is set
up as a mold for gluing the back to the ribs. The foam provides
the proper resilience to make it work well.
This
jig, which is made from another of the LMI forms for back radius, is set
up as a mold for gluing the back to the ribs. The foam provides
the proper resilience to make it work well.
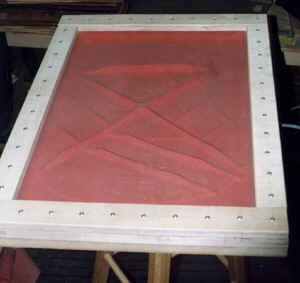 This
is the vacuum jig which I built for gluing
top braces. It is simply a flat work board (Which is made of more
of the router table stock) and a maple frame which has a piece of 1/16"
rubber sheeting in it. The bottom of the frame has a "ring"
of close pore foam to properly seal to the work board. A vacuum
line is then attached to the work board and the photo shows the result.
A better description of such a device is found in the LMI catalog.
To me the real advantage is that I can quickly glue a set of braces in
place, and after 5 minutes or so, open it up to remove any glue squeeze
out, after which I simply clamp it up again.
This
is the vacuum jig which I built for gluing
top braces. It is simply a flat work board (Which is made of more
of the router table stock) and a maple frame which has a piece of 1/16"
rubber sheeting in it. The bottom of the frame has a "ring"
of close pore foam to properly seal to the work board. A vacuum
line is then attached to the work board and the photo shows the result.
A better description of such a device is found in the LMI catalog.
To me the real advantage is that I can quickly glue a set of braces in
place, and after 5 minutes or so, open it up to remove any glue squeeze
out, after which I simply clamp it up again.
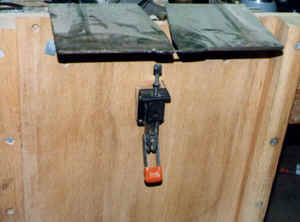
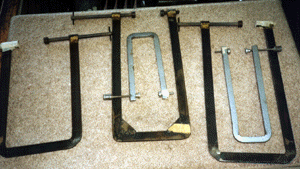 These are clamps we use
for repairing top cracks. (See next photo). The silver colored
clamps are commercially available (Stewart MacDonald). The big ones
we had made by a machinist friend years ago. (Having access to a machinist
-- or having those skills yourself -- is invaluable) Although not
used too often, they are invaluable when needed.
These are clamps we use
for repairing top cracks. (See next photo). The silver colored
clamps are commercially available (Stewart MacDonald). The big ones
we had made by a machinist friend years ago. (Having access to a machinist
-- or having those skills yourself -- is invaluable) Although not
used too often, they are invaluable when needed.
 Clamps in use.
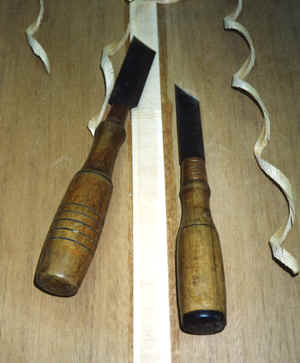 These tools have a special meaning for me. They were made for
me by Mike Osgar, a friend when I first opened
my shop. Mike worked for Lyon and Healey in the 1920's and moved
to Minneapolis during the depression. When I first met him he was
repairing and making instruments in his basement and garage, and did some
of the most beautiful work I have ever seen -- Mike was a true master
craftsman and was a great inspiration to me. He made these out
of old files and the handles are apple wood from a tree in his back yard.
They take and hold an incredible edge, and I treasure them. Mike
was more than a handworker -- he had devised and made some very
elaborate and beautiful tooling with which he made all the banjo bridges
for the Gibson company for many years.
These tools have a special meaning for me. They were made for
me by Mike Osgar, a friend when I first opened
my shop. Mike worked for Lyon and Healey in the 1920's and moved
to Minneapolis during the depression. When I first met him he was
repairing and making instruments in his basement and garage, and did some
of the most beautiful work I have ever seen -- Mike was a true master
craftsman and was a great inspiration to me. He made these out
of old files and the handles are apple wood from a tree in his back yard.
They take and hold an incredible edge, and I treasure them. Mike
was more than a handworker -- he had devised and made some very
elaborate and beautiful tooling with which he made all the banjo bridges
for the Gibson company for many years.
Note: Recently I received an e-mail from Mike Osgar's grandson, asking for any thoughts I had about Mike. Here is my response:
Bryan:
A delight to hear from you. I first met Mike in the early 70's when he
came to our shop just to visit. Later I visited him at his home on Minnehaha
Ave, and saw some of the work he was doing. He had grafted an extension
on a banjo neck and the work was just perfect -- both the wood working
and the touch up of the finish. After that I saw Mike quite a few times.
We would visit at his shop, or vice versa. One day Mike brought in the
chisels shown on the web site. He had made them out of old files (a very
time consuming job, since you can't let the metal get too hot while grinding)
and the handles were made from an apple tree in his back yard. One of
the things that impressed me the most was that although Mike was "old"
and very much an "old world craftsman," he was not an "old fart." The
evidence of this was to go into his shop in the garage back of the house
(completely different from the shop in the basement). He had a very elaborate
and modern setup to make banjo bridges for the Gibson Co. He made all
their banjo bridges. He had some very elaborate machinery, with highly
specialized cutters which he had made to his own specifications. Mike
and his next door neighbor, Gunnar, made the bridges.
I remember Mike as a very warm and accepting guy. I remember having lunch
at their house and afterwards his wife insisted on giving us (My partner
Rod and I) some homemade lye soap she had made. Mike was always very encouraging
to us and while I only learned a few specifics from him (I do one rather
specific thing to the bracing of my large guitars that I learned from
Mike, and have never seen anyone else do this), what I did learn from
Mike was an appreciation of old instruments and the value of careful craftsmanship
- it didn't matter if I was using a hand chisel he made or a very sophisticated
machine tool, that care was still there. A very valuable lesson. I have
very fond memories of Mike and still think of him often.
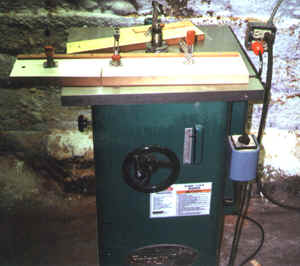 I recently got a second spindle shaper - having two has
helped a great deal, and the new one can be used as a router table as
well.
I recently got a second spindle shaper - having two has
helped a great deal, and the new one can be used as a router table as
well.
 Once I got the second shaper, I rearranged part of the
basement to hold both shapers and to properly store all of my shaper jigs.
This has worked out very well.
Once I got the second shaper, I rearranged part of the
basement to hold both shapers and to properly store all of my shaper jigs.
This has worked out very well.
This website and all of its content, text and images are copyright ©1997-2011 by Charles A. Hoffman. All rights reserved.