HARP GUITAR
The harp guitar project is now well under way. I have obtained the wood for the top, the back and the sides, and have joined one of the tops (no photo yet) (I am making two instruments) and the backs. The soundhole rosette is in the top, they have been sanded to final thickness. The mold is done. (see photos below).
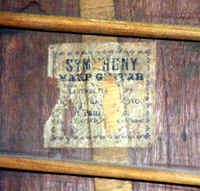
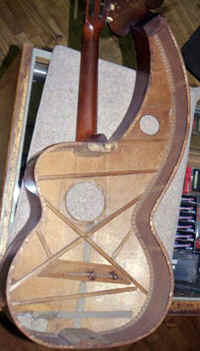
Of greater interest, a customer who collects harp guitars brought in his latest acquisition - a Dyer harp guitar which was presumably made very early in the company's history. (It was made in St. Paul, MN.) From my perspective the real "treasure" is that it has the back off (it is generally in terrible condition) so that I can look very carefully at the interior construction. There are some photos below. This has already given me several important insights which will improve the instrument.
Note: The following photos are thumbnails - click on the photo to see the full size image.
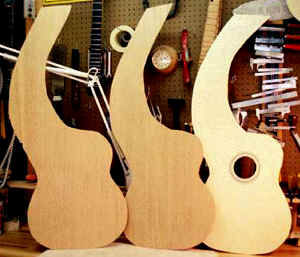 Here
the top (one of the two I will use) has the main rosette inlayed, the
top sanded to thickness and roughly profiled. I have also done the
same for the backs. The side wood is sanded to thickness, but no
more as of yet.
Here
the top (one of the two I will use) has the main rosette inlayed, the
top sanded to thickness and roughly profiled. I have also done the
same for the backs. The side wood is sanded to thickness, but no
more as of yet.
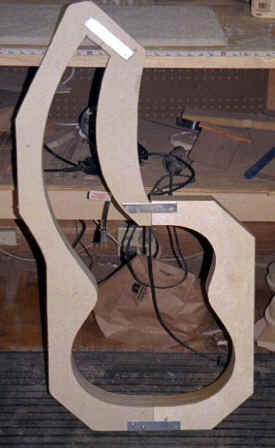 I
have completed the mold. This was in itself a bit of a design problem
because of its size and because of the configuration of the "peghead"
on the harp extension. It is angled down and this causes it to interfere
with the mold. I believe that I have figured a way to deal with
all of this. The other problem with the mold is that it weighs a
ton. Unavoidable if it is to be rigid.
I
have completed the mold. This was in itself a bit of a design problem
because of its size and because of the configuration of the "peghead"
on the harp extension. It is angled down and this causes it to interfere
with the mold. I believe that I have figured a way to deal with
all of this. The other problem with the mold is that it weighs a
ton. Unavoidable if it is to be rigid.
 I
have begun (albeit, slowly) the actual construction. The sides are
cut to size and have been bent to shape. I have also
placed the end blocks, and have cut the dovetail joint in the body.
I
have begun (albeit, slowly) the actual construction. The sides are
cut to size and have been bent to shape. I have also
placed the end blocks, and have cut the dovetail joint in the body.
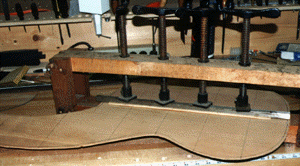 I
have begun to brace the back. The first step (for me) is to glue
on the center strip. I made the clamping jig shown many years ago,
and it continues to work well. An alternative used by many makers
is a go bar deck, but I wasn't even aware of that method when I first
started building and so never have used one.
I
have begun to brace the back. The first step (for me) is to glue
on the center strip. I made the clamping jig shown many years ago,
and it continues to work well. An alternative used by many makers
is a go bar deck, but I wasn't even aware of that method when I first
started building and so never have used one.
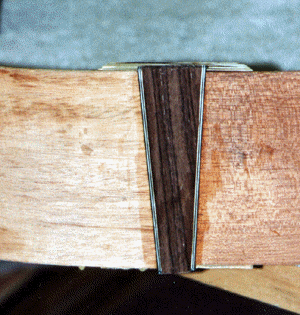 This is the butt wedge, a purely decorative element that is put in to
hide the joint where the two sides meet.
This is the butt wedge, a purely decorative element that is put in to
hide the joint where the two sides meet.
 I have started -- and completed -- bracing the tops. As shown
here, the bracing for these instruments is carefully carved and
scalloped to bring out the best sound.
I have started -- and completed -- bracing the tops. As shown
here, the bracing for these instruments is carefully carved and
scalloped to bring out the best sound.
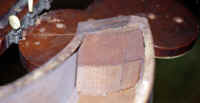
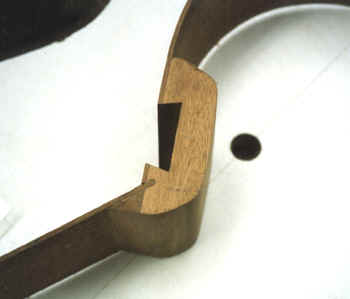 This is the neck block. This is a difficult part
of the instrument to design. The old Dyer Harp guitars had an elaborately
curved block to accommodate the side of the harp extension. While
this is a fine way to build the instrument, it is very complex and time
consuming. My method is based on the method common in classic guitars
where the sides are glued into slots cut into the neck/neck block (which
is one piece in most classic guitars.) I think that this is a strong
solution and will have the added benefit that the access to the neck in
the upper ranges will be slightly improved.
This is the neck block. This is a difficult part
of the instrument to design. The old Dyer Harp guitars had an elaborately
curved block to accommodate the side of the harp extension. While
this is a fine way to build the instrument, it is very complex and time
consuming. My method is based on the method common in classic guitars
where the sides are glued into slots cut into the neck/neck block (which
is one piece in most classic guitars.) I think that this is a strong
solution and will have the added benefit that the access to the neck in
the upper ranges will be slightly improved.
There is more progress on the harp guitars, but it will be largely shown on the pages relating to building a guitar. I will try to put links here to the relevant sections and photos.
This website and all of its content, text and images are copyright ©1997-2011 by Charles A. Hoffman. All rights reserved.